
.png)
Making a great video tutorial is about more than just pointing a camera and hitting record. It's a mix of smart planning—what we call instructional design—and using the right tech for the job. The basic flow is always the same: plan out your content, pick your tools, record your screen or camera, edit everything for clarity, and finally, get it published where people can actually see it. Following this path is what turns a simple recording into a genuinely helpful and engaging tutorial.
Have you ever stopped to think why, when you need to learn something new, you immediately search for a video? Whether it’s a complex piece of software for work or just figuring out a new recipe, video has become our go-to teacher. It’s not just a trend; it's about how our brains are wired. Video serves up a powerful combination of visuals, sound, and movement that makes tricky subjects much easier to grasp and remember compared to just reading a wall of text.
This is where good instructional design makes all the difference. Modern learning theories like microlearning—breaking down big topics into small, focused pieces—are a natural fit for video. Think about it: a quick, five-minute video on one specific feature is way more useful than a rambling, hour-long webinar. This respects people's time and, more importantly, helps the information actually stick. It’s a core idea behind the many benefits of elearning.
It wasn’t that long ago that creating polished training videos was a job for specialists with studios full of expensive gear. That world is gone. Today, incredibly powerful software has put professional-level video creation into the hands of just about anyone.
We're at a point where proven learning theories and easy-to-use technology have come together, making it the perfect time to start creating your own video tutorials.
The demand for video isn't just a hunch; the numbers are staggering. Projections show that by 2025, video will make up 82% of all internet traffic. And in the business world? A massive 89% of companies are using video, with 73% of them creating tutorials and explainer videos specifically.
So, whether you're a seasoned instructional designer building a formal course or just a passionate creator wanting to share what you know, this guide will give you a clear roadmap. For another great resource, check out this practical guide to creating effective video guides.

I see it all the time: someone gets a great idea for a tutorial and immediately jumps in and hits "record." It feels productive, but it's the single biggest mistake you can make.
Without a solid plan, you end up with a rambling, confusing video that's a nightmare to edit. Trust me on this. Every minute you spend planning up front will save you at least 10 minutes of frustration in the editing bay later. Think of it as your blueprint—you wouldn’t build a house without one, right?
Before you even think about writing a script, you have to get crystal clear on two things. Skip this, and you're basically giving directions without knowing where someone is or where they want to go.
First, who are you actually talking to? Is it a complete beginner who needs you to explain every single click? Or is it an experienced user who just wants to learn an advanced trick? The way you talk, the pace you set, and how deep you go all hinge on this answer.
Second, what should your viewer be able to do after watching? A fuzzy goal like "understand the software" is useless. Get specific. Something like, "be able to create a pivot table in Excel" gives you a clear finish line to aim for. These two answers are the bedrock of your entire tutorial.
Okay, with your audience and goals locked in, it’s time to script. And please, don't write a word-for-word monologue that sounds like a robot. A good script is your guide, not a cage. The goal is to sound like a helpful expert sitting next to someone, not a text-to-speech app.
For instance, instead of the robotic, "Next, you will navigate your cursor to the File menu and select the 'New Project' option," try this: "Alright, let's get a new project started. Just pop up to the File menu and click 'New Project'." See the difference? It’s a small tweak that completely changes the tone.
Some folks thrive on a detailed script, others prefer a simple bulleted outline. Find what works for you. The main thing is to map out your key talking points and the exact steps you'll be showing on screen. This is your chance to find confusing steps or logical gaps before you’re mid-recording.
A tight script is your best defense against "scope creep." It keeps your video focused, respects your viewer’s time, and aligns perfectly with microlearning—the modern trend of teaching one specific skill per video.
A storyboard is where your script gets its eyes. It’s the visual side of your plan. You don't need to be an artist—simple stick figures or even text descriptions of what's happening on screen are perfect. This step is a lifesaver for more complex tutorials with animations or multiple camera angles.
In the corporate world, where we develop eLearning in tools like the Articulate Suite or Adobe Captivate, storyboarding is non-negotiable. It gets everyone on the same page before a single thing is built, saving an unbelievable amount of rework.
Here’s what a quick storyboard entry could look like:
This simple exercise forces you to connect what you're saying with what the audience is seeing. It’s how you make sure the visual and audio are perfectly in sync. If you want to get more formal, you can find a great storyboard template for eLearning to make the process even smoother. Visualizing the flow like this leads to a much more polished and professional final cut.
Alright, you've got a solid plan. Now it's time for the fun part: picking the gear and software that will actually bring your tutorial to life. The right tools can make a huge difference, but don't get tricked into thinking you need a Hollywood-sized budget. Honestly, the smartest choices are often the simplest.
The market for video creation tools is booming, which is great news for us. The video tutorial software space was valued at around USD 0.47 billion in 2024 and is projected to hit a staggering USD 1.76 billion by 2033. This growth, driven by video's takeover in education and corporate training, means we're constantly getting more powerful and affordable options. You can dig into more data on the software market's rapid growth to see just how central video has become.
Let's bust a common myth right away: you probably don't need a fancy new camera. The one on your phone or your laptop's built-in webcam is usually more than enough, especially if you're just a small "talking head" in the corner of a screen recording.
Where you should absolutely invest your money is in audio and lighting.
Think of it this way: clear sound and good light are a sign of respect for your viewer's time. They're the foundation that makes everything else watchable.
Software is where you'll be spending most of your time, so choosing the right one is critical. Your choice really depends on what you're trying to do, who you're teaching, and how tech-savvy you are. The options range from super simple all-in-one editors to heavy-duty corporate tools made for serious instructional design.
A tight script keeps your message on point, but a storyboard helps you see how the visuals will play out. This infographic gives a good sense of the time commitment for each.
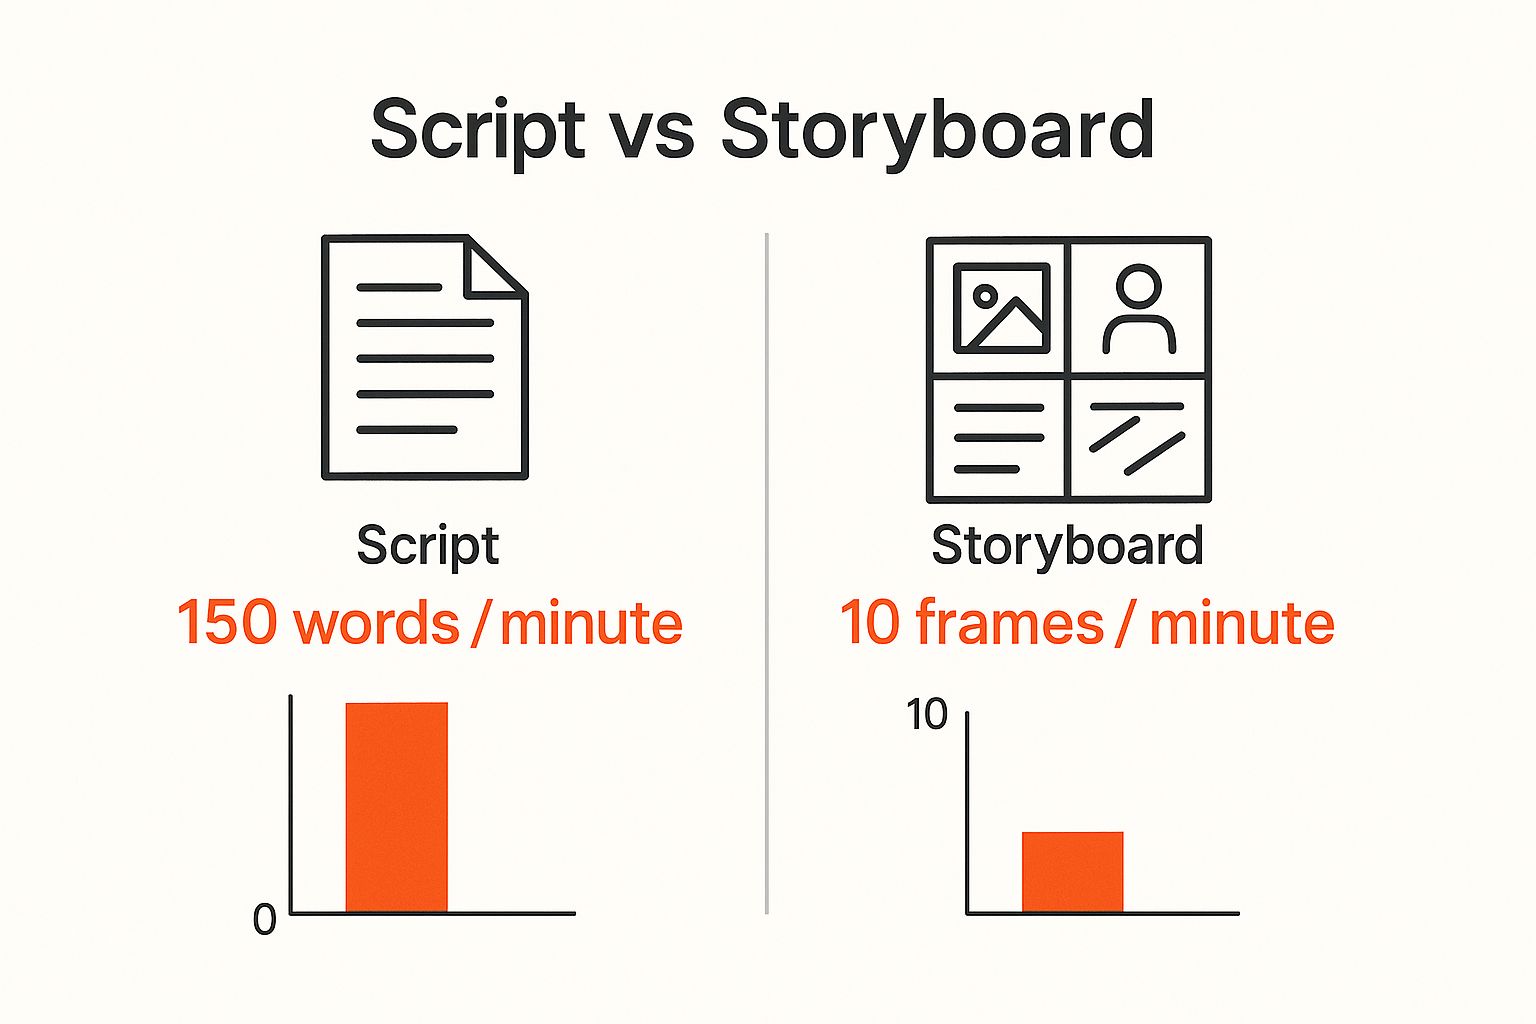
As you can see, scripting is all about verbal efficiency, while storyboarding focuses on the visual rhythm. You really need both for a high-quality tutorial.
To help you sort through the options, I've put together a quick comparison of the most common types of video tutorial software.
Ultimately, the best tool is the one that fits your specific project and workflow, so don't be afraid to experiment with free trials before you commit.
For most people getting started, an all-in-one tool like Camtasia is the perfect sweet spot. These programs are built from the ground up for making tutorials, combining screen recording, video editing, and effects into one intuitive platform.
They come packed with features you'll actually use, like cursor highlighting, on-screen callouts, and easy ways to zoom in on specific parts of your screen. This is a game-changer for clarity.
My Two Cents: Always, always use the free trial before you buy. Spend a couple of hours making a short test video. The best software for you is the one that feels natural and lets you work quickly, not the one you're constantly fighting with.
Now, if you're creating training materials in a corporate setting, you'll be playing in a different league. Here, tools like the Articulate Suite (especially Storyline 360) and Adobe Captivate are the gold standard for building robust e-learning modules.
These are much more than just video editors; they're complete authoring platforms. You can build interactive quizzes, branching scenarios, and complex software simulations. More importantly, they're designed to export packages that can be uploaded directly into a Learning Management System (LMS) or a Learning Experience Platform (LXP) to track completions and scores—a must-have for compliance and corporate training.
The newest kid on the block is AI-powered video creation software, and it's completely changing the game. These tools are designed to automate the most tedious and time-consuming parts of the video creation process.
Just imagine a workflow like this:
Tools like Descript are leading the charge here. This approach doesn't just save a massive amount of time; it also opens up video creation to people who aren't confident with their own voice or editing skills. It's a fantastic blend of smart instructional theory and accessible tech.
Okay, you've got your plan and your tools are ready to go. Now for the fun part: bringing your script and storyboard to life. But capturing clean, professional-looking video is about more than just hitting the record button. It’s all about creating an environment that lets your content do the talking.
My biggest piece of advice? Get it as right as you can during the recording. This mindset shift will save you hours of headaches later. Trust me, every minute you spend getting a clean take is worth ten minutes of tedious editing.
Before you even think about recording, take five minutes to prep your space—both physical and digital. This little bit of prep work is the secret sauce for a smooth session and a polished final video.
First up, your audio. Hard surfaces are your enemy. Bare walls and hardwood floors bounce sound around, creating that awful echo that makes you sound like you’re in a bathroom. You don't need a pro studio; just throw a rug on the floor or hang a blanket out of the camera's view. Even a few strategically placed pillows can do wonders for absorbing sound.
Next, let's declutter your digital world. Close every app you don’t need. Turn off all notifications on your computer and your phone. Nothing ruins a perfect take like a random Slack pop-up. While you're at it, clean up that messy desktop. Nobody wants to see your tax folders or browser bookmarks. A clean background keeps the focus right where it should be: on your tutorial.
Finally, do a quick test run. I mean it. Record just 30 seconds to check your audio levels, your lighting, and that you're capturing the right part of the screen. This one simple step can save you the agony of re-recording an entire video.
Here’s a game-changing tip that will transform how you make tutorials: don’t try to record everything in one perfect take. This approach, borrowed from the world of microlearning, is an absolute lifesaver.
Instead of one long, marathon recording session, break your script into small, bite-sized sections. Think two or three minutes at a time. Record one chunk, hit pause, take a breath, and then move on to the next.
The benefits here are huge:
This modular approach is a core part of modern instructional design, and it’s perfect for creating sharp, focused video tutorials.
Don’t just read your script—perform it. Speak with confidence and let your personality show in your tone. I always imagine I’m explaining it to a friend sitting right beside me. It’s a simple mental trick that makes your delivery way more engaging.
Alright, let's head to the editing suite. Your goal here isn't to add a bunch of flashy effects. It's to remove distractions and guide your viewer’s attention so the information is crystal clear. Think clarity, not complexity.
Start with your "rough cut." This is where you drop all your recorded chunks onto the timeline in the right order. Make the big, obvious cuts first—get rid of false starts, awkward pauses, or any sections you had to re-record. Don’t aim for perfection yet; just get the basic skeleton of your video built.
Once the rough cut is in place, it's time to add that professional polish. Audio is everything. Make sure it's clear and the volume is consistent. Use your software’s tools to level things out so your viewer isn't constantly reaching for the volume knob.
Now, let's talk visuals. This is where you can really help your audience.
The final piece of the puzzle is pacing. Watch your video all the way through. Does it flow nicely? Are there any parts that feel slow or drag on? Be ruthless. Cut anything that doesn't add real value. A tight, well-paced tutorial respects your viewer's time and keeps them locked in until the very end.

You’ve done the hard work of creating a fantastic tutorial, but hitting "publish" isn't the finish line. If no one sees it, did you even make it? Now comes the fun part: getting it into the hands of the right people.
Think of this final phase as the packaging and delivery. A few small tweaks, like adding a subtle intro music track for a few seconds, can instantly make your video feel more polished and professional.
But if there's one thing you absolutely cannot skip, it's the thumbnail. It's the very first thing people see, and a great, eye-catching thumbnail is often the only reason someone clicks your video instead of scrolling right past.
When your tutorial is destined for a public platform like YouTube, you have to start thinking like a search engine. People are typing questions into that search bar, and your goal is to make your video the best possible answer.
This all starts with a little keyword research. Figure out the exact phrases your audience is using to find solutions to the problem you're solving.
Once you’ve got your keywords, you need to weave them into your video's metadata. This isn't about spamming tags; it's about giving the algorithm clear signals.
Creating tutorials for a corporate environment is a different game entirely. You're not uploading to YouTube; you're likely working within a Learning Management System (LMS) or a Learning Experience Platform (LXP).
Discoverability isn't the main challenge here—technical standards are.
This is where authoring tools like the Articulate Suite or Adobe Captivate are lifesavers. They let you export your entire tutorial as a neat little package, usually in a format called SCORM (Sharable Content Object Reference Model).
A SCORM package is just a ZIP file that tells the LMS how to track everything—who watched the video, if they completed it, and how they did on any quizzes. This is crucial for things like compliance training and actually measuring if the training is effective. If this is all new to you, getting familiar with the different types of learning management systems is a smart move.
Your budget will heavily influence how you get your video out there. Quality costs money, but it almost always pays off. The global average production cost for application tutorials is around $1,700 per minute, with bigger brands often spending over $3,100 per minute for that premium feel.
It's not just about vanity metrics. A whopping 68% of marketers agree that a higher price tag directly translates to a better-quality video, and better quality means better engagement. You can see a full breakdown of video tutorial production costs to help you budget realistically.
Alright, you've hit publish. Now what? You don't need a huge marketing department to get the word out. A few smart moves can make a world of difference.
Here’s a quick-and-dirty checklist to get your tutorial in front of more people:
Treating promotion as a core part of your creation process ensures your hard work doesn't just sit on a server somewhere—it actually makes an impact.
Even with a solid plan, you'll probably hit a few snags. Learning how to make great video tutorials is a journey, and figuring things out as you go is just part of the process. Let's dig into some of the most common questions I hear from creators, from keeping viewers hooked to picking the right tech.
Engagement isn't about fancy animations or a thumping soundtrack. It's about respecting your viewer's time and mental energy. To keep them watching, you need to deliver clarity and maintain a good pace.
One of the biggest wins here is embracing microlearning. Instead of a sprawling 30-minute epic, why not break that topic into five or six shorter, laser-focused videos? This makes the information way easier to absorb and lets people quickly find the one specific answer they're looking for. It also helps to switch things up—maybe start with a quick "talking head" intro to connect with your audience before jumping into the screen recording.
A great tutorial doesn't just show someone what to do; it makes them feel confident they can do it. When you empower your viewer like that, you've created real engagement.
You absolutely should. The conversation about AI has moved past "if" we should use it to "how" we can use it best. AI-powered tools can be a massive time-saver, especially for the parts of the process that feel like a grind, like banging out a first-draft script or recording a clean voiceover.
Here are a few ways I’ve seen them work wonders:
Think of these tools as an assistant. They handle the tedious stuff, which frees you up to focus on what really matters: the teaching.
For an internal team, the answer really comes down to whether you need to track what they've learned. If you're just sharing a quick how-to, a standard MP4 file on a shared drive or company intranet is probably fine.
But if you're dealing with compliance or any kind of formal training, you'll need something more powerful. This is where you bring in the heavy hitters like the Articulate Suite or Adobe Captivate. These let you export your video as a SCORM package, which is basically the universal language that talks to a Learning Management System (LMS) or a Learning Experience Platform (LXP). This is how you track who has completed the training, their quiz scores, and other activity—data that's non-negotiable for most HR and training departments.
Creating truly effective tutorials is a skill you'll refine over time. If you want to dive deeper into the nuts and bolts of the entire workflow, check out this complete guide to making tutorial videos.
Ready to create polished, effective eLearning content for your team? Relevant Training specializes in developing and updating engaging materials that get results. Check out our services and find your next opportunity on our industry-specific job board at https://relevant.training.

.webp)